# .NET Core 下使用 ElasticSearch
# 快速入门
# 安装
# 接入使用
新建一个webapi项目,然后安装两个组件。
Install-Package NEST
Install-Package Swashbuckle.AspNetCore
2
通过NEST来实现操作Elasticsearch,开源地址:https://github.com/elastic/elasticsearch-net (opens new window),同时将swagger也添加以下方便后面调用接口。
接下来演示一个对Elasticsearch的增删改查操作。
添加实体类:VisitLog.cs。
using System;

namespace ESDemo.Domain
{
    public class VisitLog
    {
        public string Id { get; set; }

        /// <summary>
        /// UserAgent
        /// </summary>
        public string UserAgent { get; set; }

        /// <summary>
        /// Method
        /// </summary>
        public string Method { get; set; }

        /// <summary>
        /// Url
        /// </summary>
        public string Url { get; set; }

        /// <summary>
        /// Referrer
        /// </summary>
        public string Referrer { get; set; }

        /// <summary>
        /// IpAddress
        /// </summary>
        public string IpAddress { get; set; }

        /// <summary>
        /// Milliseconds
        /// </summary>
        public int Milliseconds { get; set; }

        /// <summary>
        /// QueryString
        /// </summary>
        public string QueryString { get; set; }

        /// <summary>
        /// Request Body
        /// </summary>
        public string RequestBody { get; set; }

        /// <summary>
        /// Cookies
        /// </summary>
        public string Cookies { get; set; }

        /// <summary>
        /// Headers
        /// </summary>
        public string Headers { get; set; }

        /// <summary>
        /// StatusCode
        /// </summary>
        public int StatusCode { get; set; }

        /// <summary>
        /// Response Body
        /// </summary>
        public string ResponseBody { get; set; }

        public DateTimeOffset CreatedAt { get; set; } = DateTimeOffset.UtcNow;
    }
}
2
3
4
5
6
7
8
9
10
11
12
13
14
15
16
17
18
19
20
21
22
23
24
25
26
27
28
29
30
31
32
33
34
35
36
37
38
39
40
41
42
43
44
45
46
47
48
49
50
51
52
53
54
55
56
57
58
59
60
61
62
63
64
65
66
67
68
69
70
71
确定好实体类后,来包装一下Elasticsearch,简单封装一个基类用于仓储的集成使用。
添加一个接口类IElasticsearchProvider。
using Nest;

namespace ESDemo.Elasticsearch
{
    public interface IElasticsearchProvider
    {
        IElasticClient GetClient();
    }
}
2
3
4
5
6
7
8
9
在ElasticsearchProvider中实现IElasticsearchProvider接口。
using Nest;
using System;

namespace ESDemo.Elasticsearch
{
    public class ElasticsearchProvider : IElasticsearchProvider
    {
        public IElasticClient GetClient()
        {
            var connectionSettings = new ConnectionSettings(new Uri("http://localhost:9200"));

            return new ElasticClient(connectionSettings);
        }
    }
}
2
3
4
5
6
7
8
9
10
11
12
13
14
15
添加Elasticsearch仓储基类,ElasticsearchRepositoryBase。
using Nest;

namespace ESDemo.Elasticsearch
{
    public abstract class ElasticsearchRepositoryBase
    {
        private readonly IElasticsearchProvider _elasticsearchProvider;

        public ElasticsearchRepositoryBase(IElasticsearchProvider elasticsearchProvider)
        {
            _elasticsearchProvider = elasticsearchProvider;
        }

        protected IElasticClient Client => _elasticsearchProvider.GetClient();

        protected abstract string IndexName { get; }
    }
}
2
3
4
5
6
7
8
9
10
11
12
13
14
15
16
17
18
也就是一个抽象类,当我们集成此基类的时候需要重写protected abstract string IndexName { get; },指定IndexName。
完成上面简单封装,现在新建一个IVisitLogRepository仓储接口,里面添加四个方法:
using ESDemo.Domain;
using System;
using System.Collections.Generic;
using System.Threading.Tasks;

namespace ESDemo.Repositories
{
    public interface IVisitLogRepository
    {
        Task InsertAsync(VisitLog visitLog);

        Task DeleteAsync(string id);

        Task UpdateAsync(VisitLog visitLog);

        Task<Tuple<int, IList<VisitLog>>> QueryAsync(int page, int limit);
    }
}
2
3
4
5
6
7
8
9
10
11
12
13
14
15
16
17
18
所以接下来不用说你也知道改干嘛,实现这个仓储接口,添加VisitLogRepository,代码如下:
using ESDemo.Domain;
using ESDemo.Elasticsearch;
using System;
using System.Collections.Generic;
using System.Linq;
using System.Threading.Tasks;

namespace ESDemo.Repositories
{
    public class VisitLogRepository : ElasticsearchRepositoryBase, IVisitLogRepository
    {
        public VisitLogRepository(IElasticsearchProvider elasticsearchProvider) : base(elasticsearchProvider)
        {
        }

        protected override string IndexName => "visitlogs";

        public async Task InsertAsync(VisitLog visitLog)
        {
            await Client.IndexAsync(visitLog, x => x.Index(IndexName));
        }

        public async Task DeleteAsync(string id)
        {
            await Client.DeleteAsync<VisitLog>(id, x => x.Index(IndexName));
        }

        public async Task UpdateAsync(VisitLog visitLog)
        {
            await Client.UpdateAsync<VisitLog>(visitLog.Id, x => x.Index(IndexName).Doc(visitLog));
        }

        public async Task<Tuple<int, IList<VisitLog>>> QueryAsync(int page, int limit)
        {
            var query = await Client.SearchAsync<VisitLog>(x => x.Index(IndexName)
                                    .From((page - 1) * limit)
                                    .Size(limit)
                                    .Sort(x => x.Descending(v => v.CreatedAt)));
            return new Tuple<int, IList<VisitLog>>(Convert.ToInt32(query.Total), query.Documents.ToList());
        }
    }
}
2
3
4
5
6
7
8
9
10
11
12
13
14
15
16
17
18
19
20
21
22
23
24
25
26
27
28
29
30
31
32
33
34
35
36
37
38
39
40
41
42
现在去写接口,添加一个VisitLogControllerAPI控制器,代码如下:
using ESDemo.Domain;
using ESDemo.Repositories;
using Microsoft.AspNetCore.Mvc;
using System.ComponentModel.DataAnnotations;
using System.Threading.Tasks;

namespace ESDemo.Controllers
{
    [Route("api/[controller]")]
    [ApiController]
    public class VisitLogController : ControllerBase
    {
        private readonly IVisitLogRepository _visitLogRepository;

        public VisitLogController(IVisitLogRepository visitLogRepository)
        {
            _visitLogRepository = visitLogRepository;
        }

        [HttpGet]
        public async Task<IActionResult> QueryAsync(int page = 1, int limit = 10)
        {
            var result = await _visitLogRepository.QueryAsync(page, limit);

            return Ok(new
            {
                total = result.Item1,
                items = result.Item2
            });
        }

        [HttpPost]
        public async Task<IActionResult> InsertAsync([FromBody] VisitLog visitLog)
        {
            await _visitLogRepository.InsertAsync(visitLog);

            return Ok("新增成功");
        }

        [HttpDelete]
        public async Task<IActionResult> DeleteAsync([Required] string id)
        {
            await _visitLogRepository.DeleteAsync(id);

            return Ok("删除成功");
        }

        [HttpPut]
        public async Task<IActionResult> UpdateAsync([FromBody] VisitLog visitLog)
        {
            await _visitLogRepository.UpdateAsync(visitLog);

            return Ok("修改成功");
        }
    }
}
2
3
4
5
6
7
8
9
10
11
12
13
14
15
16
17
18
19
20
21
22
23
24
25
26
27
28
29
30
31
32
33
34
35
36
37
38
39
40
41
42
43
44
45
46
47
48
49
50
51
52
53
54
55
56
大功告成,最后一步不要忘记在Startup.cs中添加服务,不然无法使用依赖注入。
...
services.AddSingleton<IElasticsearchProvider, ElasticsearchProvider>();
services.AddSingleton<IVisitLogRepository, VisitLogRepository>();
...
2
3
4
一切准备就绪,现在满怀期待的运行项目,打开swagger界面。
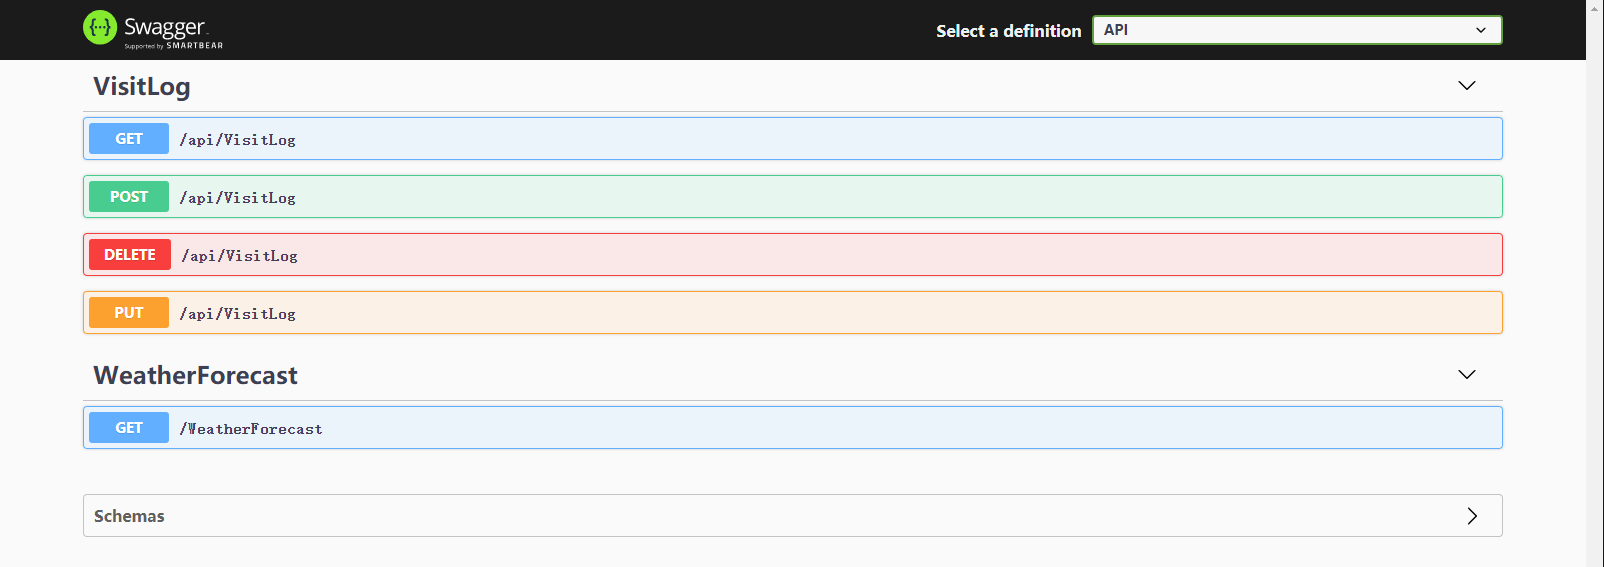
按照新增、更新、删除、查询的顺序依次调用接口。新增可以多来几次,因为默认是没有数据的,多添加一点可以测试分页是否ok,这里就不再演示了。
如果你有安装kibana,现在可以满怀惊喜的去查看一下刚才添加的数据。
GET _cat/indices

GET visitlogs/_search
{}
2
3
4
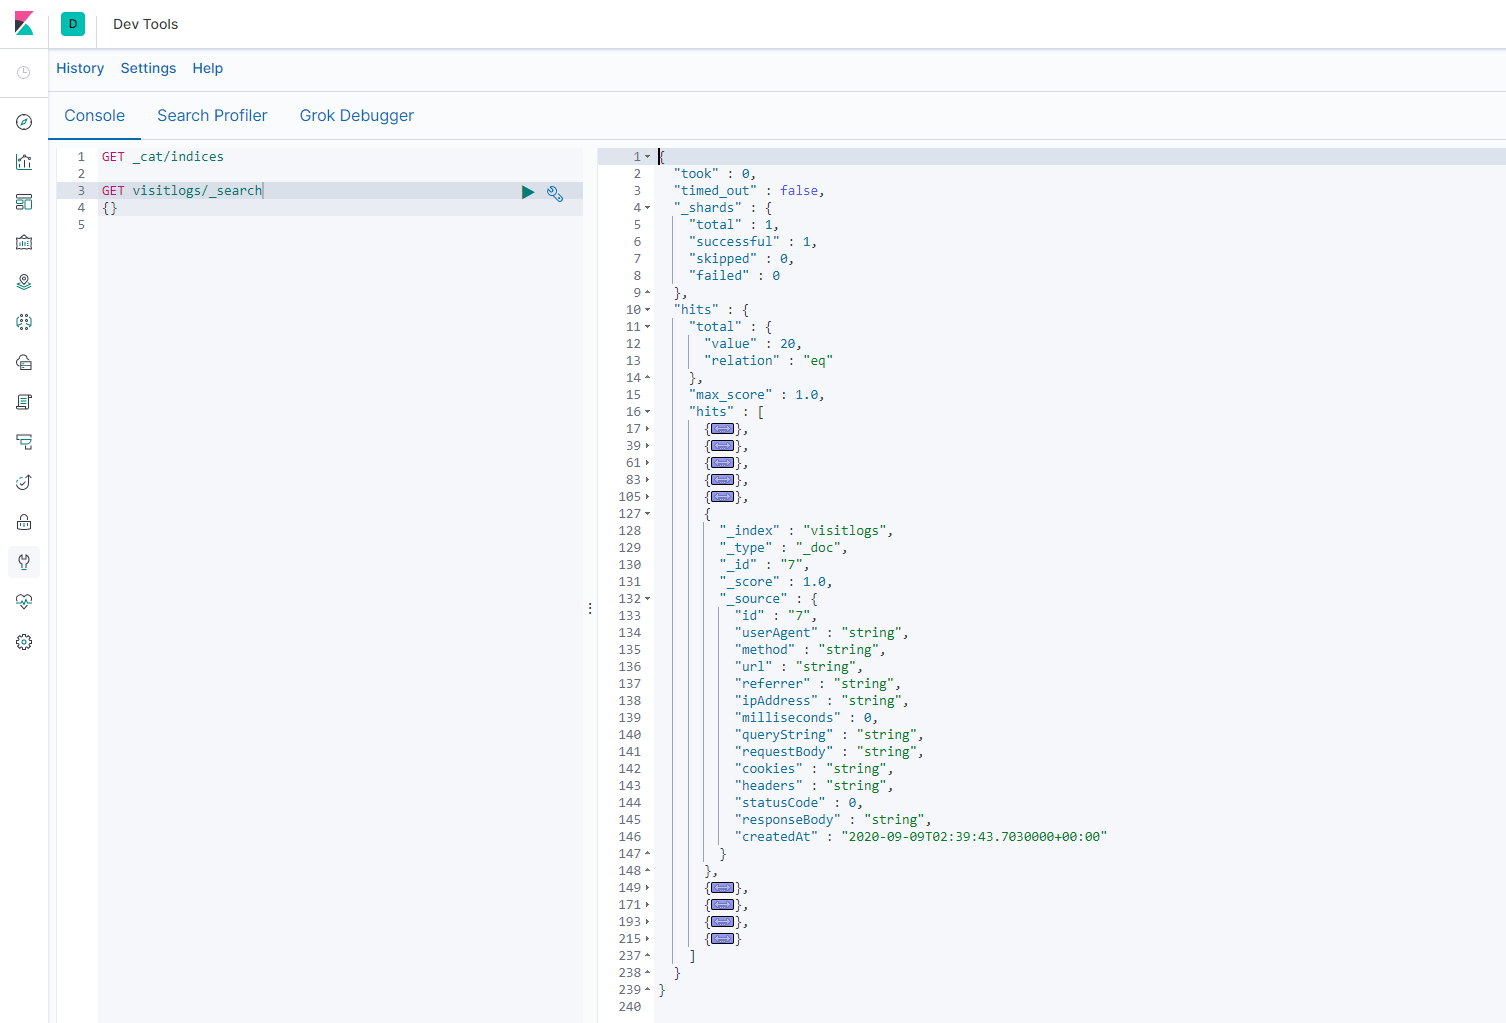
可以看到,数据已经安安静静的躺在这里了。
本篇简单介绍Elasticsearch在.NET Core中的使用,关于检索数据还有很多语法没有体现出来,如果在开发中需要用到,可以参考官方的各种数据查询示例:https://github.com/elastic/elasticsearch-net/tree/master/examples (opens new window)