# Blazor 实战系列(六)
上一篇完成了博客文章详情页面的数据展示和基于JWT方式的简单身份验证,本篇继续推进,完成后台分类管理的所有增删改查等功能。
# 分类管理
在 Admin 文件夹下新建Razor组件,Categories.razor,设置路由,@page "/admin/categories"。将具体的展示内容放在组件AdminLayout中。
@page "/admin/categories"

<AdminLayout>
      <Loading />
</AdminLayout>
2
3
4
5
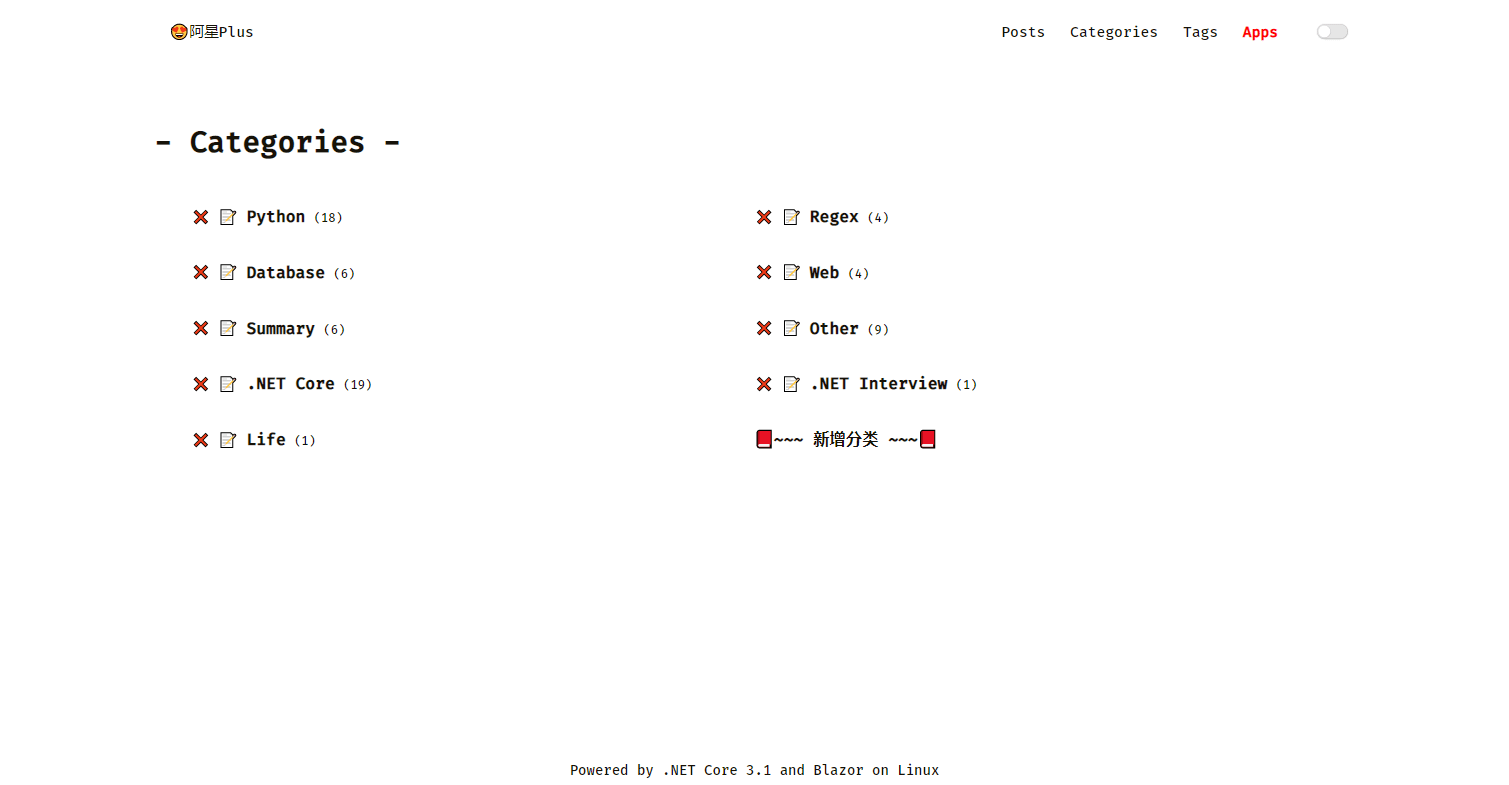
在这里我会将所有分类展示出来,新增、更新、删除都会放在一个页面上去完成。
先将列表查出来,添加API的返回参数,private ServiceResult<IEnumerable<QueryCategoryForAdminDto>> categories;,然后再初始化中去获取数据。
//QueryCategoryForAdminDto.cs
namespace Meowv.Blog.BlazorApp.Response.Blog
{
    public class QueryCategoryForAdminDto : QueryCategoryDto
    {
        /// <summary>
        /// 主键
        /// </summary>
        public int Id { get; set; }
    }
}
2
3
4
5
6
7
8
9
10
11
/// <summary>
/// API返回的分类列表数据
/// </summary>
private ServiceResult<IEnumerable<QueryCategoryForAdminDto>> categories;

/// <summary>
/// 初始化
/// </summary>
/// <returns></returns>
protected override async Task OnInitializedAsync()
{
    var token = await Common.GetStorageAsync("token");
    Http.DefaultRequestHeaders.Add("Authorization", $"Bearer {token}");

    categories = await FetchData();
}

/// <summary>
/// 获取数据
/// </summary>
/// <returns></returns>
private async Task<ServiceResult<IEnumerable<QueryCategoryForAdminDto>>> FetchData()
{
    return await Http.GetFromJsonAsync<ServiceResult<IEnumerable<QueryCategoryForAdminDto>>>("/blog/admin/categories");
}
2
3
4
5
6
7
8
9
10
11
12
13
14
15
16
17
18
19
20
21
22
23
24
25
初始化的时候,需要将我们存在localStorage中的token读取出来,因为我们后台的API都需要添加 Authorization Header 请求头才能成功返回数据。
在Blazor添加请求头也是比较方便的,直接Http.DefaultRequestHeaders.Add(...)即可,要注意的是 token值前面需要加 Bearer,跟了一个空格不可以省略。
获取数据单独提成了一个方法FetchData(),因为会频繁用到,现在在页面上将数据绑定进行展示。
@if (categories == null)
{
<Loading />
}
else
{
<div class="post-wrap categories">
<h2 class="post-title">- Categories -</h2>
@if (categories.Success && categories.Result.Any())
{
<div class="categories-card">
@foreach (var item in categories.Result)
{
<div class="card-item">
<div class="categories">
<NavLink title="❌删除" @onclick="@(async () => await DeleteAsync(item.Id))">❌</NavLink>
<NavLink title="📝编辑" @onclick="@(() => ShowBox(item))">📝</NavLink>
<NavLink target="_blank" href="@($"/category/{item.DisplayName}")">
<h3>@item.CategoryName</h3>
<small>(@item.Count)</small>
</NavLink>
</div>
</div>
}
<div class="card-item">
<div class="categories">
<NavLink><h3 @onclick="@(() => ShowBox())">📕~~~ 新增分类 ~~~📕</h3></NavLink>
</div>
</div>
</div>
}
else
{
<ErrorTip />
}
</div>
}
2
3
4
5
6
7
8
9
10
11
12
13
14
15
16
17
18
19
20
21
22
23
24
25
26
27
28
29
30
31
32
33
34
35
36
37
同样的当categories还没成功获取到数据的时候,我们直接在展示 <Loading />组件。然后就是循环列表数据在foreach中进行绑定数据。
在每条数据最前面,加了删除和编辑两个按钮,删除的时候调用DeleteAsync方法,将当前分类的Id传给他即可。新增和编辑的时候调用ShowBox方法,他接受一个参数,当前循环到的分类对象item,即QueryCategoryForAdminDto。
同时这里考虑到复用性,我写了一个弹窗组件,Box.Razor,放在Shared文件夹下面,可以先看一下标题为弹窗组件的内容再回来继续往下看。
# 删除分类
接下来看看删除方法。
/// <summary>
/// 删除分类
/// </summary>
/// <param name="id"></param>
/// <returns></returns>
private async Task DeleteAsync(int id)
{
    // 弹窗确认
    bool confirmed = await Common.InvokeAsync<bool>("confirm", "\n💥💢真的要干掉这个该死的分类吗💢💥");

    if (confirmed)
    {
        var response = await Http.DeleteAsync($"/blog/category?id={id}");

        var result = await response.Content.ReadFromJsonAsync<ServiceResult>();

        if (result.Success)
        {
            categories = await FetchData();
        }
    }
}
2
3
4
5
6
7
8
9
10
11
12
13
14
15
16
17
18
19
20
21
22
删除之前搞个原生的confirm进行提示,避免手残误删。因为API那边使用的是HttpDelete,所有我们调用API时候要用Http.DeleteAsync,返回的是HttpResponseMessage对象,需要我们手动处理接收返回数据,将其转换为ServiceResult对象,如果判断删除成功后重新调用FetchData()刷新分类数据。
# 新增/更新分类
新增和更新数据选择使用弹窗的方式来进行(弹窗组件在下方),首先是需要一个参数判断弹窗是否打开,因为是将新增和更新放在一起,所以如何判断是新增还是更新呢?这里使用Id来进行判断,当编辑的时候肯定会有Id参数。新增的时候是没有参数传递的。
当我们打开弹窗后里面需要展示两个input框,用来供输入要保存的数据,同样是添加两个变量。
添加所需的这几个参数。
/// <summary>
/// 默认隐藏Box
/// </summary>
private bool Open { get; set; } = false;

/// <summary>
/// 新增或者更新时候的分类字段值
/// </summary>
private string categoryName, displayName;

/// <summary>
/// 更新分类的Id值
/// </summary>
private int id;
2
3
4
5
6
7
8
9
10
11
12
13
14
现在可以将Box组件添加到页面上。
<div class="post-wrap categories">
    ...
</div>

<Box OnClickCallback="@SubmitAsync" Open="@Open">
    <div class="box-item">
        <b>DisplayName:</b><input type="text" @bind="@displayName" @bind:event="oninput" />
    </div>
    <div class="box-item">
        <b>CategoryName:</b><input type="text" @bind="@categoryName" @bind:event="oninput" />
    </div>
</Box>
2
3
4
5
6
7
8
9
10
11
12
确定按钮回调事件执行SubmitAsync()方法,打开状态参数为上面添加的Open,按钮文字ButtonText为默认值不填。
添加了两个input,将两个分类字段分别绑定上去,使用@bind和@bind:event。前者等价于设置其value值,后者等价于一个change事件当值改变后会重新赋给绑定的字段参数。
现在可以来看看点击了新增或者编辑按钮的方法ShowBox(...),接收一个参数QueryCategoryForAdminDto让其默认值为null。
/// <summary>
/// 显示box,绑定字段
/// </summary>
/// <param name="dto"></param>
private void ShowBox(QueryCategoryForAdminDto dto = null)
{
    Open = true;
    id = 0;

    // 新增
    if (dto == null)
    {
        displayName = null;
        categoryName = null;
    }
    else // 更新
    {
        id = dto.Id;
        displayName = dto.DisplayName;
        categoryName = dto.CategoryName;
    }
}
2
3
4
5
6
7
8
9
10
11
12
13
14
15
16
17
18
19
20
21
22
执行ShowBox()方法,将弹窗打开,设置Open = true;和初始化id的值id = 0;。
通过参数是否null进行判断是新增还是更新,这样打开弹窗就搞定了,剩下的就交给弹窗来处理了。
因为新增和更新API需要还对应的输入参数EditCategoryInput,去添加它不要忘了。
那么现在就只差按钮回调事件SubmitAsync()了,主要是给输入参数进行赋值调用API,执行新增或者更新即可。
/// <summary>
/// 确认按钮点击事件
/// </summary>
/// <returns></returns>
private async Task SubmitAsync()
{
    var input = new EditCategoryInput()
    {
        DisplayName = displayName.Trim(),
        CategoryName = categoryName.Trim()
    };

    if (string.IsNullOrEmpty(input.DisplayName) || string.IsNullOrEmpty(input.CategoryName))
    {
        return;
    }

    var responseMessage = new HttpResponseMessage();

    if (id > 0)
        responseMessage = await Http.PutAsJsonAsync($"/blog/category?id={id}", input);
    else
        responseMessage = await Http.PostAsJsonAsync("/blog/category", input);

    var result = await responseMessage.Content.ReadFromJsonAsync<ServiceResult>();
    if (result.Success)
    {
        categories = await FetchData();
        Open = false;
    }
}
2
3
4
5
6
7
8
9
10
11
12
13
14
15
16
17
18
19
20
21
22
23
24
25
26
27
28
29
30
31
当参数为空时,直接return什么都不执行。通过当前Id判断是新增还是更新操作,调用不同的方法PutAsJsonAsync和PostAsJsonAsync去请求API,同样返回到是HttpResponseMessage对象,最后如果操作成功,重新请求一个数据,刷新分类列表,将弹窗关闭掉。
分类管理页面的全部代码如下:
点击查看代码
@page "/admin/categories"
<AdminLayout>
@if (categories == null)
{
<Loading />
}
else
{
<div class="post-wrap categories">
<h2 class="post-title">- Categories -</h2>
@if (categories.Success && categories.Result.Any())
{
<div class="categories-card">
@foreach (var item in categories.Result)
{
<div class="card-item">
<div class="categories">
<NavLink title="❌删除" @onclick="@(async () => await DeleteAsync(item.Id))">❌</NavLink>
<NavLink title="📝编辑" @onclick="@(() => ShowBox(item))">📝</NavLink>
<NavLink target="_blank" href="@($"/category/{item.DisplayName}")">
<h3>@item.CategoryName</h3>
<small>(@item.Count)</small>
</NavLink>
</div>
</div>
}
<div class="card-item">
<div class="categories">
<NavLink><h3 @onclick="@(() => ShowBox())">📕~~~ 新增分类 ~~~📕</h3></NavLink>
</div>
</div>
</div>
}
else
{
<ErrorTip />
}
</div>
<Box OnClickCallback="@SubmitAsync" Open="@Open">
<div class="box-item">
<b>DisplayName:</b><input type="text" @bind="@displayName" @bind:event="oninput" />
</div>
<div class="box-item">
<b>CategoryName:</b><input type="text" @bind="@categoryName" @bind:event="oninput" />
</div>
</Box>
}
</AdminLayout>
@code {
/// <summary>
/// 默认隐藏Box
/// </summary>
private bool Open { get; set; } = false;
/// <summary>
/// 新增或者更新时候的分类字段值
/// </summary>
private string categoryName, displayName;
/// <summary>
/// 更新分类的Id值
/// </summary>
private int id;
/// <summary>
/// API返回的分类列表数据
/// </summary>
private ServiceResult<IEnumerable<QueryCategoryForAdminDto>> categories;
/// <summary>
/// 初始化
/// </summary>
/// <returns></returns>
protected override async Task OnInitializedAsync()
{
var token = await Common.GetStorageAsync("token");
Http.DefaultRequestHeaders.Add("Authorization", $"Bearer {token}");
categories = await FetchData();
}
/// <summary>
/// 获取数据
/// </summary>
/// <returns></returns>
private async Task<ServiceResult<IEnumerable<QueryCategoryForAdminDto>>> FetchData()
{
return await Http.GetFromJsonAsync<ServiceResult<IEnumerable<QueryCategoryForAdminDto>>>("/blog/admin/categories");
}
/// <summary>
/// 删除分类
/// </summary>
/// <param name="id"></param>
/// <returns></returns>
private async Task DeleteAsync(int id)
{
Open = false;
// 弹窗确认
bool confirmed = await Common.InvokeAsync<bool>("confirm", "\n💥💢真的要干掉这个该死的分类吗💢💥");
if (confirmed)
{
var response = await Http.DeleteAsync($"/blog/category?id={id}");
var result = await response.Content.ReadFromJsonAsync<ServiceResult>();
if (result.Success)
{
categories = await FetchData();
}
}
}
/// <summary>
/// 显示box,绑定字段
/// </summary>
/// <param name="dto"></param>
private void ShowBox(QueryCategoryForAdminDto dto = null)
{
Open = true;
id = 0;
// 新增
if (dto == null)
{
displayName = null;
categoryName = null;
}
else // 更新
{
id = dto.Id;
displayName = dto.DisplayName;
categoryName = dto.CategoryName;
}
}
/// <summary>
/// 确认按钮点击事件
/// </summary>
/// <returns></returns>
private async Task SubmitAsync()
{
var input = new EditCategoryInput()
{
DisplayName = displayName.Trim(),
CategoryName = categoryName.Trim()
};
if (string.IsNullOrEmpty(input.DisplayName) || string.IsNullOrEmpty(input.CategoryName))
{
return;
}
var responseMessage = new HttpResponseMessage();
if (id > 0)
responseMessage = await Http.PutAsJsonAsync($"/blog/category?id={id}", input);
else
responseMessage = await Http.PostAsJsonAsync("/blog/category", input);
var result = await responseMessage.Content.ReadFromJsonAsync<ServiceResult>();
if (result.Success)
{
categories = await FetchData();
Open = false;
}
}
}
2
3
4
5
6
7
8
9
10
11
12
13
14
15
16
17
18
19
20
21
22
23
24
25
26
27
28
29
30
31
32
33
34
35
36
37
38
39
40
41
42
43
44
45
46
47
48
49
50
51
52
53
54
55
56
57
58
59
60
61
62
63
64
65
66
67
68
69
70
71
72
73
74
75
76
77
78
79
80
81
82
83
84
85
86
87
88
89
90
91
92
93
94
95
96
97
98
99
100
101
102
103
104
105
106
107
108
109
110
111
112
113
114
115
116
117
118
119
120
121
122
123
124
125
126
127
128
129
130
131
132
133
134
135
136
137
138
139
140
141
142
143
144
145
146
147
148
149
150
151
152
153
154
155
156
157
158
159
160
161
162
163
164
165
166
167
168
169
170
171
172
173
# 弹窗组件
考虑到新增和更新数据的时候需要弹窗,这里就简单演示一下写一个小组件。
在 Shared 文件夹下新建一个Box.razor。
在开始之前分析一下弹窗组件所需的元素,弹窗肯定有一个确认和取消按钮,右上角需要有一个关闭按钮,关闭按钮和取消按钮一个意思。他还需要一个打开或者关闭的状态,判断是否打开弹窗,还有就是弹窗内需要自定义展示内容。
确定按钮的文字可以自定义,所以差不多就需要3个参数,组件内容RenderFragment ChildContent,是否打开弹窗bool Open默认隐藏,按钮文字string ButtonText默认值给"确定"。然后最重要的是确定按钮需要一个回调事件,EventCallback<MouseEventArgs> OnClickCallback 用于执行不同的事件。
/// <summary>
/// 组件内容
/// </summary>
[Parameter]
public RenderFragment ChildContent { get; set; }

/// <summary>
/// 是否隐藏
/// </summary>
[Parameter]
public bool Open { get; set; } = true;

/// <summary>
/// 按钮文字
/// </summary>
[Parameter]
public string ButtonText { get; set; } = "确定";

/// <summary>
/// 确认按钮点击事件回调
/// </summary>
[Parameter]
public EventCallback<MouseEventArgs> OnClickCallback { get; set; }

/// <summary>
/// 关闭Box
/// </summary>
private void Close() => Open = false;
2
3
4
5
6
7
8
9
10
11
12
13
14
15
16
17
18
19
20
21
22
23
24
25
26
27
28
右上角关闭和取消按钮直接在内部进行处理,执行Close()方法,将参数Open值设置为false即可。
对应的html如下。
@if (Open)
{
    <div class="shadow"></div>
    <div class="box">
        <div class="close" @onclick="Close">❌</div>
        <div class="box-content">
            @ChildContent
            <div class="box-item box-item-btn">
                <button class="box-btn" @onclick="OnClickCallback">@ButtonText</button>
                <button class="box-btn btn-primary" @onclick="Close">取消</button>
            </div>
        </div>
    </div>
}
2
3
4
5
6
7
8
9
10
11
12
13
14
# 关于样式
下面是弹窗组件所需的样式代码,大家需要的自取,也可以直接去GitHub实时获取最新的样式文件。
.box {
    width: 600px;
    height: 300px;
    border-radius: 5px;
    background-color: #fff;
    position: fixed;
    top: 50%;
    left: 50%;
    margin-top: -150px;
    margin-left: -300px;
    z-index: 997;
}
.close {
    position: absolute;
    right: 3px;
    top: 2px;
    cursor: pointer;
}
.shadow {
    width: 100%;
    height: 100%;
    position: fixed;
    left: 0;
    top: 0;
    z-index: 996;
    background-color: #000;
    opacity: 0.3;
}
.box-content {
    width: 90%;
    margin: 20px auto;
}
.box-item {
    margin-top: 10px;
    height: 30px;
}
.box-item b {
    width: 130px;
    display: inline-block;
}
.box-item input[type=text] {
    padding-left: 5px;
    width: 300px;
    height: 30px;
}
.box-item label {
    width: 100px;
    white-space: nowrap;
}
.box-item input[type=radio] {
    width: auto;
    height: auto;
    visibility: initial;
    display: initial;
    margin-right: 2px;
}
.box-item button {
    height: 30px;
    width: 100px;
}
.box-item-btn {
    position: absolute;
    right: 20px;
    bottom: 20px;
}
.box-btn {
    display: inline-block;
    height: 30px;
    line-height: 30px;
    padding: 0 18px;
    background-color: #5A9600;
    color: #fff;
    white-space: nowrap;
    text-align: center;
    font-size: 14px;
    border: none;
    border-radius: 2px;
    cursor: pointer;
}
button:focus {
    outline: 0;
}
.box-btn:hover {
    opacity: .8;
    filter: alpha(opacity=80);
    color: #fff;
}
.btn-primary {
    border: 1px solid #C9C9C9;
    background-color: #fff;
    color: #555;
}
.btn-primary:hover {
    border-color: #5A9600;
    color: #333;
}
.post-box {
    width: 98%;
    margin: 27px auto 0;
}
.post-box-item {
    width: 100%;
    height: 30px;
    margin-bottom: 5px;
}
.post-box-item input {
    width: 49.5%;
    height: 30px;
    padding-left: 5px;
    border: 1px solid #ddd;
}
.post-box-item input:nth-child(1) {
    float: left;
    margin-right: 1px;
}
.post-box-item input:nth-child(2) {
    float: right;
    margin-left: 1px;
}
.post-box .box-item b {
    width: auto;
}
.post-box .box-item input[type=text] {
    width: 90%;
}
2
3
4
5
6
7
8
9
10
11
12
13
14
15
16
17
18
19
20
21
22
23
24
25
26
27
28
29
30
31
32
33
34
35
36
37
38
39
40
41
42
43
44
45
46
47
48
49
50
51
52
53
54
55
56
57
58
59
60
61
62
63
64
65
66
67
68
69
70
71
72
73
74
75
76
77
78
79
80
81
82
83
84
85
86
87
88
89
90
91
92
93
94
95
96
97
98
99
100
101
102
103
104
105
106
107
108
109
110
111
112
113
114
115
116
117
118
119
120
121
122
123
124
125
126
好了,分类模块的功能都完成了,标签和友情链接的管理界面还会远吗?这两个模块的做法和分类是一样的,有兴趣的可以自己动手完成,今天到这吧,未完待续...