# 使用Redis缓存数据
上一篇文章完成了项目的全局异常处理和日志记录。
在日志记录中使用的静态方法有人指出写法不是很优雅,遂优化一下上一篇中日志记录的方法,具体操作如下:
在.ToolKits层中新建扩展方法Log4NetExtensions.cs。
//Log4NetExtensions.cs
using log4net;
using log4net.Config;
using Microsoft.Extensions.Hosting;
using System.IO;
using System.Reflection;

namespace Meowv.Blog.ToolKits.Extensions
{
    public static class Log4NetExtensions
    {
        public static IHostBuilder UseLog4Net(this IHostBuilder hostBuilder)
        {
            var log4netRepository = LogManager.GetRepository(Assembly.GetEntryAssembly());
            XmlConfigurator.Configure(log4netRepository, new FileInfo("log4net.config"));

            return hostBuilder;
        }
    }
}
2
3
4
5
6
7
8
9
10
11
12
13
14
15
16
17
18
19
20
配置log4net,然后我们直接返回IHostBuilder对象,便于在Main方法中链式调用。
//Program.cs
using Meowv.Blog.ToolKits.Extensions;
using Microsoft.AspNetCore.Hosting;
using Microsoft.Extensions.Hosting;
using System.Threading.Tasks;

namespace Meowv.Blog.HttpApi.Hosting
{
    public class Program
    {
        public static async Task Main(string[] args)
        {
            await Host.CreateDefaultBuilder(args)
                      .UseLog4Net()
                      .ConfigureWebHostDefaults(builder =>
                      {
                          builder.UseIISIntegration()
                                 .UseStartup<Startup>();
                      }).UseAutofac().Build().RunAsync();
        }
    }
}
2
3
4
5
6
7
8
9
10
11
12
13
14
15
16
17
18
19
20
21
22
然后修改MeowvBlogExceptionFilter过滤器,代码如下:
//MeowvBlogExceptionFilter.cs
using log4net;
using Microsoft.AspNetCore.Mvc.Filters;

namespace Meowv.Blog.HttpApi.Hosting.Filters
{
    public class MeowvBlogExceptionFilter : IExceptionFilter
    {
        private readonly ILog _log;

        public MeowvBlogExceptionFilter()
        {
            _log = LogManager.GetLogger(typeof(MeowvBlogExceptionFilter));
        }

        /// <summary>
        /// 异常处理
        /// </summary>
        /// <param name="context"></param>
        /// <returns></returns>
        public void OnException(ExceptionContext context)
        {
            // 错误日志记录
            _log.Error($"{context.HttpContext.Request.Path}|{context.Exception.Message}", context.Exception);
        }
    }
}
2
3
4
5
6
7
8
9
10
11
12
13
14
15
16
17
18
19
20
21
22
23
24
25
26
27
可以删掉之前添加的LoggerHelper.cs类,运行一下,同样可以达到预期效果。
本篇将集成Redis,使用Redis来缓存数据,使用方法参考的微软官方文档:https://docs.microsoft.com/zh-cn/aspnet/core/performance/caching/distributed (opens new window)
关于Redis的介绍这里就不多说了,这里有一篇快速入门的文章:Redis快速入门及使用 (opens new window),对于不了解的同学可以看看。
直入主题,先在appsettings.json配置Redis的连接字符串。
//appsettings.json
...
  "Caching": {
    "RedisConnectionString": "127.0.0.1:6379,password=123456,ConnectTimeout=15000,SyncTimeout=5000"
  }
...
2
3
4
5
6
对应的,在AppSettings.cs中读取。
//AppSettings.cs
...
    /// <summary>
    /// Caching
    /// </summary>
    public static class Caching
    {
        /// <summary>
        /// RedisConnectionString
        /// </summary>
        public static string RedisConnectionString => _config["Caching:RedisConnectionString"];
    }
...
2
3
4
5
6
7
8
9
10
11
12
13
在.Application.Caching层添加包Microsoft.Extensions.Caching.StackExchangeRedis,然后在模块类MeowvBlogApplicationCachingModule中添加配置缓存实现。
//MeowvBlogApplicationCachingModule.cs
using Meowv.Blog.Domain;
using Meowv.Blog.Domain.Configurations;
using Microsoft.Extensions.DependencyInjection;
using Volo.Abp.Caching;
using Volo.Abp.Modularity;

namespace Meowv.Blog.Application.Caching
{
    [DependsOn(
        typeof(AbpCachingModule),
        typeof(MeowvBlogDomainModule)
    )]
    public class MeowvBlogApplicationCachingModule : AbpModule
    {
        public override void ConfigureServices(ServiceConfigurationContext context)
        {
            context.Services.AddStackExchangeRedisCache(options =>
            {
                options.Configuration = AppSettings.Caching.RedisConnectionString;
                //options.InstanceName
                //options.ConfigurationOptions
            });
        }
    }
}
2
3
4
5
6
7
8
9
10
11
12
13
14
15
16
17
18
19
20
21
22
23
24
25
26
options.Configuration是 Redis 的连接字符串。
options.InstanceNam是 Redis 实例名称,这里没填。
options.ConfigurationOptions是 Redis 的配置属性,如果配置了这个字,将优先于 Configuration 中的配置,同时它支持更多的选项。我这里也没填。
紧接着我们就可以直接使用了,直接将IDistributedCache接口依赖关系注入即可。
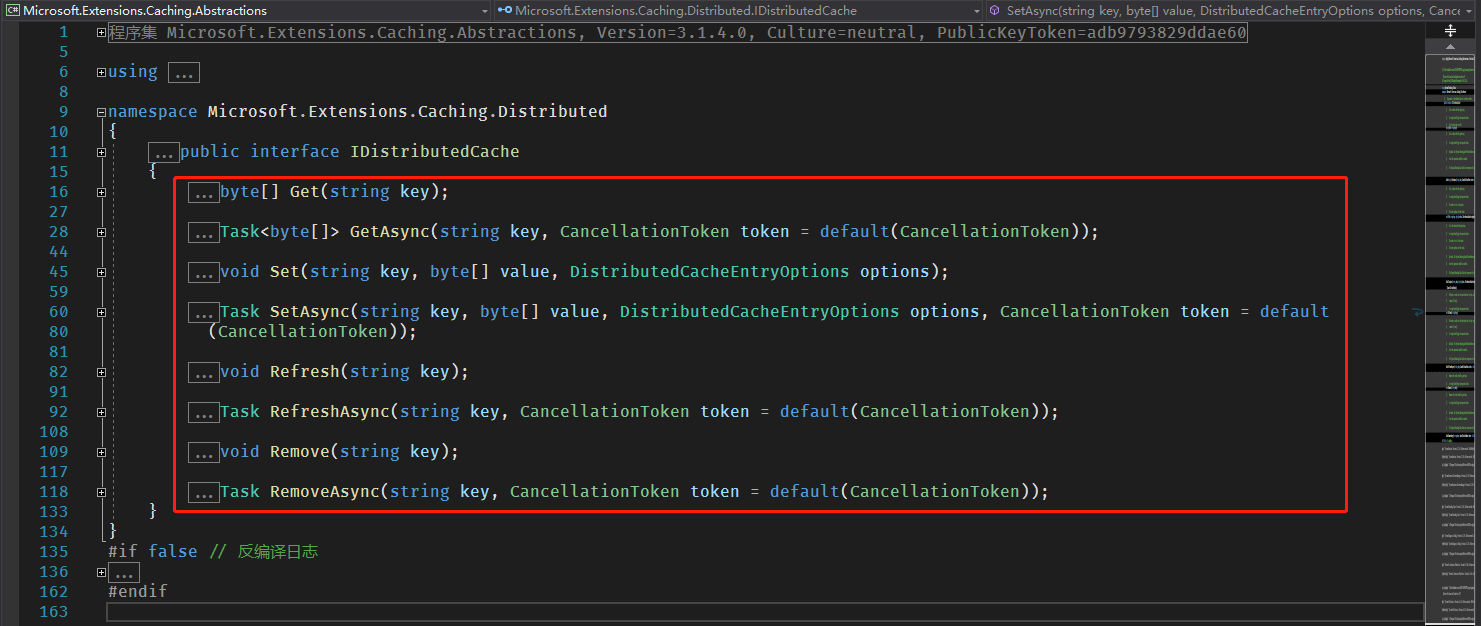
可以看到默认已经实现了这么多常用的接口,已经够我这个小项目用的了,同时在Microsoft.Extensions.Caching.Distributed.DistributedCacheExtensions中微软还给我们提供了很多扩展方法。
于是,我们我就想到写一个新的扩展方法,可以同时处理获取和添加缓存的操作,当缓存存在时,直接返回,不存在时,添加缓存。
新建MeowvBlogApplicationCachingExtensions.cs扩展方法,如下:
//MeowvBlogApplicationCachingExtensions.cs
using Meowv.Blog.ToolKits.Extensions;
using Microsoft.Extensions.Caching.Distributed;
using System;
using System.Threading.Tasks;

namespace Meowv.Blog.Application.Caching
{
    public static class MeowvBlogApplicationCachingExtensions
    {
        /// <summary>
        /// 获取或添加缓存
        /// </summary>
        /// <typeparam name="TCacheItem"></typeparam>
        /// <param name="cache"></param>
        /// <param name="key"></param>
        /// <param name="factory"></param>
        /// <param name="minutes"></param>
        /// <returns></returns>
        public static async Task<TCacheItem> GetOrAddAsync<TCacheItem>(this IDistributedCache cache, string key, Func<Task<TCacheItem>> factory, int minutes)
        {
            TCacheItem cacheItem;

            var result = await cache.GetStringAsync(key);
            if (string.IsNullOrEmpty(result))
            {
                cacheItem = await factory.Invoke();

                var options = new DistributedCacheEntryOptions();
                if (minutes != CacheStrategy.NEVER)
                {
                    options.AbsoluteExpiration = DateTimeOffset.Now.AddMinutes(minutes);
                }

                await cache.SetStringAsync(key, cacheItem.ToJson(), options);
            }
            else
            {
                cacheItem = result.FromJson<TCacheItem>();
            }

            return cacheItem;
        }
    }
}
2
3
4
5
6
7
8
9
10
11
12
13
14
15
16
17
18
19
20
21
22
23
24
25
26
27
28
29
30
31
32
33
34
35
36
37
38
39
40
41
42
43
44
45
我们可以在DistributedCacheEntryOptions中可以配置我们的缓存过期时间,其中有一个判断条件,就是当minutes = -1的时候,不指定过期时间,那么我们的缓存就不会过期了。
GetStringAsync()、SetStringAsync()是DistributedCacheExtensions的扩展方法,最终会将缓存项cacheItem转换成JSON格式进行存储。
CacheStrategy是在.Domain.Shared层定义的缓存过期时间策略常量。
//MeowvBlogConsts.cs
...
        /// <summary>
        /// 缓存过期时间策略
        /// </summary>
        public static class CacheStrategy
        {
            /// <summary>
            /// 一天过期24小时
            /// </summary>

            public const int ONE_DAY = 1440;

            /// <summary>
            /// 12小时过期
            /// </summary>

            public const int HALF_DAY = 720;

            /// <summary>
            /// 8小时过期
            /// </summary>

            public const int EIGHT_HOURS = 480;

            /// <summary>
            /// 5小时过期
            /// </summary>

            public const int FIVE_HOURS = 300;

            /// <summary>
            /// 3小时过期
            /// </summary>

            public const int THREE_HOURS = 180;

            /// <summary>
            /// 2小时过期
            /// </summary>

            public const int TWO_HOURS = 120;

            /// <summary>
            /// 1小时过期
            /// </summary>

            public const int ONE_HOURS = 60;

            /// <summary>
            /// 半小时过期
            /// </summary>

            public const int HALF_HOURS = 30;

            /// <summary>
            /// 5分钟过期
            /// </summary>
            public const int FIVE_MINUTES = 5;

            /// <summary>
            /// 1分钟过期
            /// </summary>
            public const int ONE_MINUTE = 1;

            /// <summary>
            /// 永不过期
            /// </summary>

            public const int NEVER = -1;
        }
...
2
3
4
5
6
7
8
9
10
11
12
13
14
15
16
17
18
19
20
21
22
23
24
25
26
27
28
29
30
31
32
33
34
35
36
37
38
39
40
41
42
43
44
45
46
47
48
49
50
51
52
53
54
55
56
57
58
59
60
61
62
63
64
65
66
67
68
69
70
71
72
接下来去创建缓存接口类和实现类,然后再我们的引用服务层.Application中进行调用,拿上一篇中接入GitHub的几个接口来做新增缓存操作。
和.Application层格式一样,在.Application.Caching中新建Authorize文件夹,添加缓存接口IAuthorizeCacheService和实现类AuthorizeCacheService。
注意命名规范,实现类肯定要继承一个公共的CachingServiceBase基类。在.Application.Caching层根目录添加MeowvBlogApplicationCachingServiceBase.cs,继承ITransientDependency。
//MeowvBlogApplicationCachingServiceBase.cs
using Microsoft.Extensions.Caching.Distributed;
using Volo.Abp.DependencyInjection;

namespace Meowv.Blog.Application.Caching
{
    public class CachingServiceBase : ITransientDependency
    {
        public IDistributedCache Cache { get; set; }
    }
}
2
3
4
5
6
7
8
9
10
11
然后使用属性注入的方式,注入IDistributedCache。这样我们只要继承了基类:CachingServiceBase,就可以愉快的使用缓存了。
添加要缓存的接口到IAuthorizeCacheService,在这里我们使用Func()方法,我们的接口返回什么类型由Func()来决定,于是添加三个接口如下:
//IAuthorizeCacheService.cs
using Meowv.Blog.ToolKits.Base;
using System;
using System.Threading.Tasks;

namespace Meowv.Blog.Application.Caching.Authorize
{
    public interface IAuthorizeCacheService
    {
        /// <summary>
        /// 获取登录地址(GitHub)
        /// </summary>
        /// <returns></returns>
        Task<ServiceResult<string>> GetLoginAddressAsync(Func<Task<ServiceResult<string>>> factory);

        /// <summary>
        /// 获取AccessToken
        /// </summary>
        /// <param name="code"></param>
        /// <param name="factory"></param>
        /// <returns></returns>
        Task<ServiceResult<string>> GetAccessTokenAsync(string code, Func<Task<ServiceResult<string>>> factory);

        /// <summary>
        /// 登录成功,生成Token
        /// </summary>
        /// <param name="access_token"></param>
        /// <param name="factory"></param>
        /// <returns></returns>
        Task<ServiceResult<string>> GenerateTokenAsync(string access_token, Func<Task<ServiceResult<string>>> factory);
    }
}
2
3
4
5
6
7
8
9
10
11
12
13
14
15
16
17
18
19
20
21
22
23
24
25
26
27
28
29
30
31
32
是不是和IAuthorizeService代码很像,的确,我就是直接复制过来改的。
在AuthorizeCacheService中实现接口。
//AuthorizeCacheService.cs
using Meowv.Blog.ToolKits.Base;
using Meowv.Blog.ToolKits.Extensions;
using System;
using System.Threading.Tasks;
using static Meowv.Blog.Domain.Shared.MeowvBlogConsts;

namespace Meowv.Blog.Application.Caching.Authorize.Impl
{
    public class AuthorizeCacheService : CachingServiceBase, IAuthorizeCacheService
    {
        private const string KEY_GetLoginAddress = "Authorize:GetLoginAddress";

        private const string KEY_GetAccessToken = "Authorize:GetAccessToken-{0}";

        private const string KEY_GenerateToken = "Authorize:GenerateToken-{0}";

        /// <summary>
        /// 获取登录地址(GitHub)
        /// </summary>
        /// <param name="factory"></param>
        /// <returns></returns>
        public async Task<ServiceResult<string>> GetLoginAddressAsync(Func<Task<ServiceResult<string>>> factory)
        {
            return await Cache.GetOrAddAsync(KEY_GetLoginAddress, factory, CacheStrategy.NEVER);
        }

        /// <summary>
        /// 获取AccessToken
        /// </summary>
        /// <param name="code"></param>
        /// <param name="factory"></param>
        /// <returns></returns>
        public async Task<ServiceResult<string>> GetAccessTokenAsync(string code, Func<Task<ServiceResult<string>>> factory)
        {
            return await Cache.GetOrAddAsync(KEY_GetAccessToken.FormatWith(code), factory, CacheStrategy.FIVE_MINUTES);
        }

        /// <summary>
        /// 登录成功,生成Token
        /// </summary>
        /// <param name="access_token"></param>
        /// <param name="factory"></param>
        /// <returns></returns>
        public async Task<ServiceResult<string>> GenerateTokenAsync(string access_token, Func<Task<ServiceResult<string>>> factory)
        {
            return await Cache.GetOrAddAsync(KEY_GenerateToken.FormatWith(access_token), factory, CacheStrategy.ONE_HOURS);
        }
    }
}
2
3
4
5
6
7
8
9
10
11
12
13
14
15
16
17
18
19
20
21
22
23
24
25
26
27
28
29
30
31
32
33
34
35
36
37
38
39
40
41
42
43
44
45
46
47
48
49
50
代码很简单,每个缓存都有固定KEY值,根据参数生成KEY,然后调用前面写的扩展方法,再给一个过期时间即可,可以看到KEY里面包含了冒号 :,这个冒号 : 可以起到类似于文件夹的操作,在界面化管理工具中可以很友好的查看。
这样我们的缓存就搞定了,然后在.Application层对应的Service中进行调用。代码如下:
//AuthorizeService.cs
using Meowv.Blog.Application.Caching.Authorize;
using Meowv.Blog.Domain.Configurations;
using Meowv.Blog.ToolKits.Base;
using Meowv.Blog.ToolKits.Extensions;
using Meowv.Blog.ToolKits.GitHub;
using Microsoft.IdentityModel.Tokens;
using System;
using System.IdentityModel.Tokens.Jwt;
using System.Linq;
using System.Net;
using System.Net.Http;
using System.Net.Http.Headers;
using System.Security.Claims;
using System.Threading.Tasks;

namespace Meowv.Blog.Application.Authorize.Impl
{
    public class AuthorizeService : ServiceBase, IAuthorizeService
    {
        private readonly IAuthorizeCacheService _authorizeCacheService;
        private readonly IHttpClientFactory _httpClient;

        public AuthorizeService(IAuthorizeCacheService authorizeCacheService,
                                IHttpClientFactory httpClient)
        {
            _authorizeCacheService = authorizeCacheService;
            _httpClient = httpClient;
        }

        /// <summary>
        /// 获取登录地址(GitHub)
        /// </summary>
        /// <returns></returns>
        public async Task<ServiceResult<string>> GetLoginAddressAsync()
        {
            return await _authorizeCacheService.GetLoginAddressAsync(async () =>
            {
                var result = new ServiceResult<string>();

                var request = new AuthorizeRequest();
                var address = string.Concat(new string[]
                {
                    GitHubConfig.API_Authorize,
                    "?client_id=", request.Client_ID,
                    "&scope=", request.Scope,
                    "&state=", request.State,
                    "&redirect_uri=", request.Redirect_Uri
                });

                result.IsSuccess(address);
                return await Task.FromResult(result);
            });
        }

        /// <summary>
        /// 获取AccessToken
        /// </summary>
        /// <param name="code"></param>
        /// <returns></returns>
        public async Task<ServiceResult<string>> GetAccessTokenAsync(string code)
        {
            var result = new ServiceResult<string>();

            if (string.IsNullOrEmpty(code))
            {
                result.IsFailed("code为空");
                return result;
            }

            return await _authorizeCacheService.GetAccessTokenAsync(code, async () =>
            {
                var request = new AccessTokenRequest();

                var content = new StringContent($"code={code}&client_id={request.Client_ID}&redirect_uri={request.Redirect_Uri}&client_secret={request.Client_Secret}");
                content.Headers.ContentType = new MediaTypeHeaderValue("application/x-www-form-urlencoded");

                using var client = _httpClient.CreateClient();
                var httpResponse = await client.PostAsync(GitHubConfig.API_AccessToken, content);

                var response = await httpResponse.Content.ReadAsStringAsync();

                if (response.StartsWith("access_token"))
                    result.IsSuccess(response.Split("=")[1].Split("&").First());
                else
                    result.IsFailed("code不正确");

                return result;
            });
        }

        /// <summary>
        /// 登录成功,生成Token
        /// </summary>
        /// <param name="access_token"></param>
        /// <returns></returns>
        public async Task<ServiceResult<string>> GenerateTokenAsync(string access_token)
        {
            var result = new ServiceResult<string>();

            if (string.IsNullOrEmpty(access_token))
            {
                result.IsFailed("access_token为空");
                return result;
            }

            return await _authorizeCacheService.GenerateTokenAsync(access_token, async () =>
            {
                var url = $"{GitHubConfig.API_User}?access_token={access_token}";
                using var client = _httpClient.CreateClient();
                client.DefaultRequestHeaders.Add("User-Agent", "Mozilla/5.0 (Windows NT 10.0; Win64; x64) AppleWebKit/537.36 (KHTML, like Gecko) Chrome/83.0.4103.14 Safari/537.36 Edg/83.0.478.13");
                var httpResponse = await client.GetAsync(url);
                if (httpResponse.StatusCode != HttpStatusCode.OK)
                {
                    result.IsFailed("access_token不正确");
                    return result;
                }

                var content = await httpResponse.Content.ReadAsStringAsync();

                var user = content.FromJson<UserResponse>();
                if (user.IsNull())
                {
                    result.IsFailed("未获取到用户数据");
                    return result;
                }

                if (user.Id != GitHubConfig.UserId)
                {
                    result.IsFailed("当前账号未授权");
                    return result;
                }

                var claims = new[] {
                    new Claim(ClaimTypes.Name, user.Name),
                    new Claim(ClaimTypes.Email, user.Email),
                    new Claim(JwtRegisteredClaimNames.Exp, $"{new DateTimeOffset(DateTime.Now.AddMinutes(AppSettings.JWT.Expires)).ToUnixTimeSeconds()}"),
                    new Claim(JwtRegisteredClaimNames.Nbf, $"{new DateTimeOffset(DateTime.Now).ToUnixTimeSeconds()}")
                };

                var key = new SymmetricSecurityKey(AppSettings.JWT.SecurityKey.SerializeUtf8());
                var creds = new SigningCredentials(key, SecurityAlgorithms.HmacSha256);

                var securityToken = new JwtSecurityToken(
                    issuer: AppSettings.JWT.Domain,
                    audience: AppSettings.JWT.Domain,
                    claims: claims,
                    expires: DateTime.Now.AddMinutes(AppSettings.JWT.Expires),
                    signingCredentials: creds);

                var token = new JwtSecurityTokenHandler().WriteToken(securityToken);

                result.IsSuccess(token);
                return await Task.FromResult(result);
            });
        }
    }
}
2
3
4
5
6
7
8
9
10
11
12
13
14
15
16
17
18
19
20
21
22
23
24
25
26
27
28
29
30
31
32
33
34
35
36
37
38
39
40
41
42
43
44
45
46
47
48
49
50
51
52
53
54
55
56
57
58
59
60
61
62
63
64
65
66
67
68
69
70
71
72
73
74
75
76
77
78
79
80
81
82
83
84
85
86
87
88
89
90
91
92
93
94
95
96
97
98
99
100
101
102
103
104
105
106
107
108
109
110
111
112
113
114
115
116
117
118
119
120
121
122
123
124
125
126
127
128
129
130
131
132
133
134
135
136
137
138
139
140
141
142
143
144
145
146
147
148
149
150
151
152
153
154
155
156
157
158
直接return我们的缓存接口,当查询到Redis中存在KEY值的缓存就不会再走我们的具体的实现方法了。
注意注意,千万不要忘了在.Application层的模块类中添加依赖缓存模块MeowvBlogApplicationCachingModule,不然就会报错报错报错(我就是忘了添加...)
//MeowvBlogApplicationCachingModule.cs
using Meowv.Blog.Domain;
using Meowv.Blog.Domain.Configurations;
using Microsoft.Extensions.DependencyInjection;
using Volo.Abp.Caching;
using Volo.Abp.Modularity;

namespace Meowv.Blog.Application.Caching
{
    [DependsOn(
        typeof(AbpCachingModule),
        typeof(MeowvBlogDomainModule)
    )]
    public class MeowvBlogApplicationCachingModule : AbpModule
    {
        public override void ConfigureServices(ServiceConfigurationContext context)
        {
            context.Services.AddStackExchangeRedisCache(options =>
            {
                options.Configuration = AppSettings.Caching.RedisConnectionString;
            });
        }
    }
}
2
3
4
5
6
7
8
9
10
11
12
13
14
15
16
17
18
19
20
21
22
23
24
此时项目的层级目录结构。
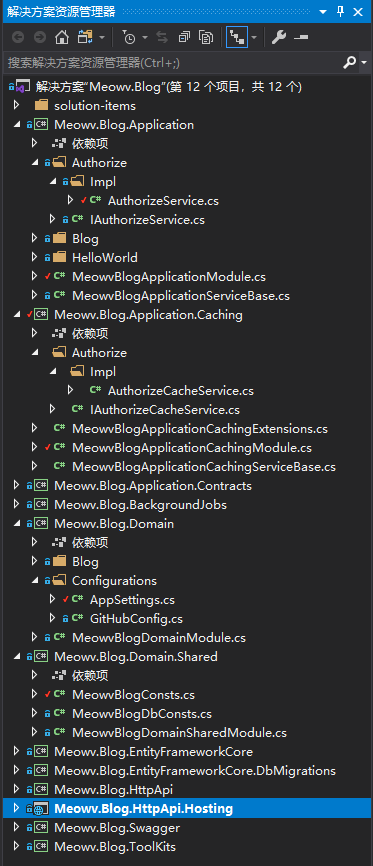
好的,编译运行项目,现在去调用接口看看效果,为了真实,这里我先将我redis缓存数据全部干掉。
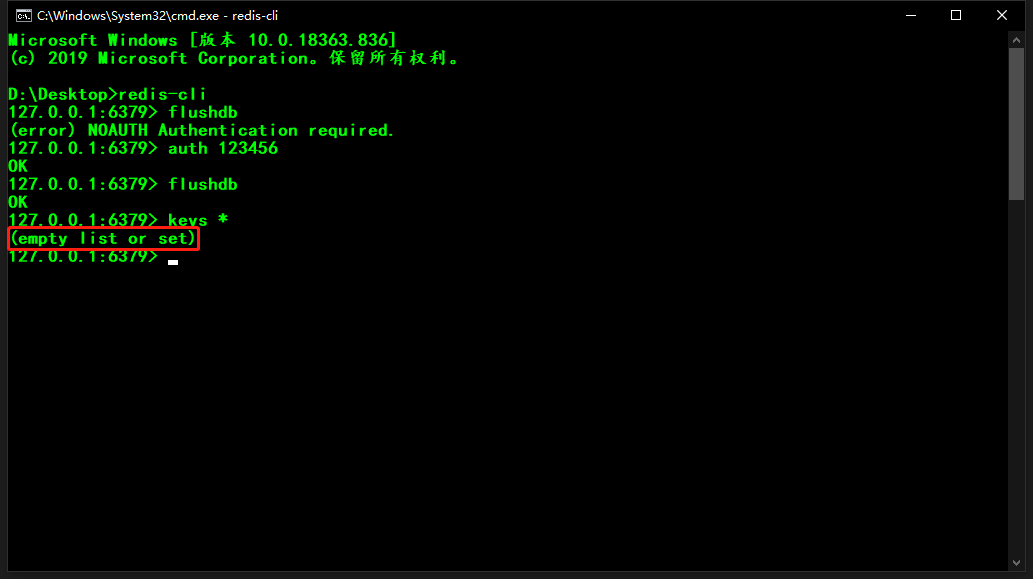
访问接口,.../auth/url,成功返回数据,现在再去看看我们的redis。
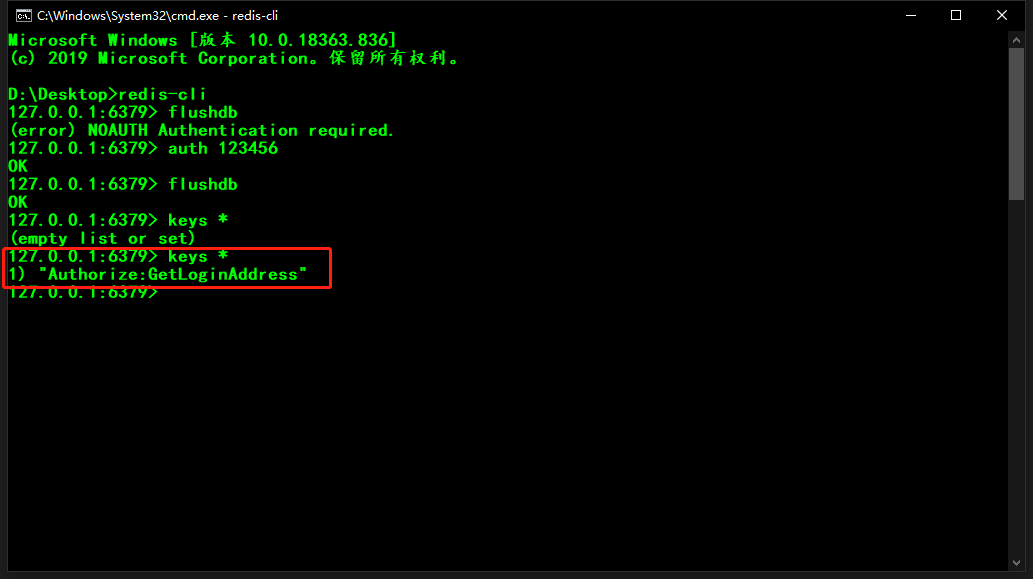
成功将KEY为:Authorize:GetLoginAddress 添加进去了,这里直接使用RedisDesktopManager进行查看。
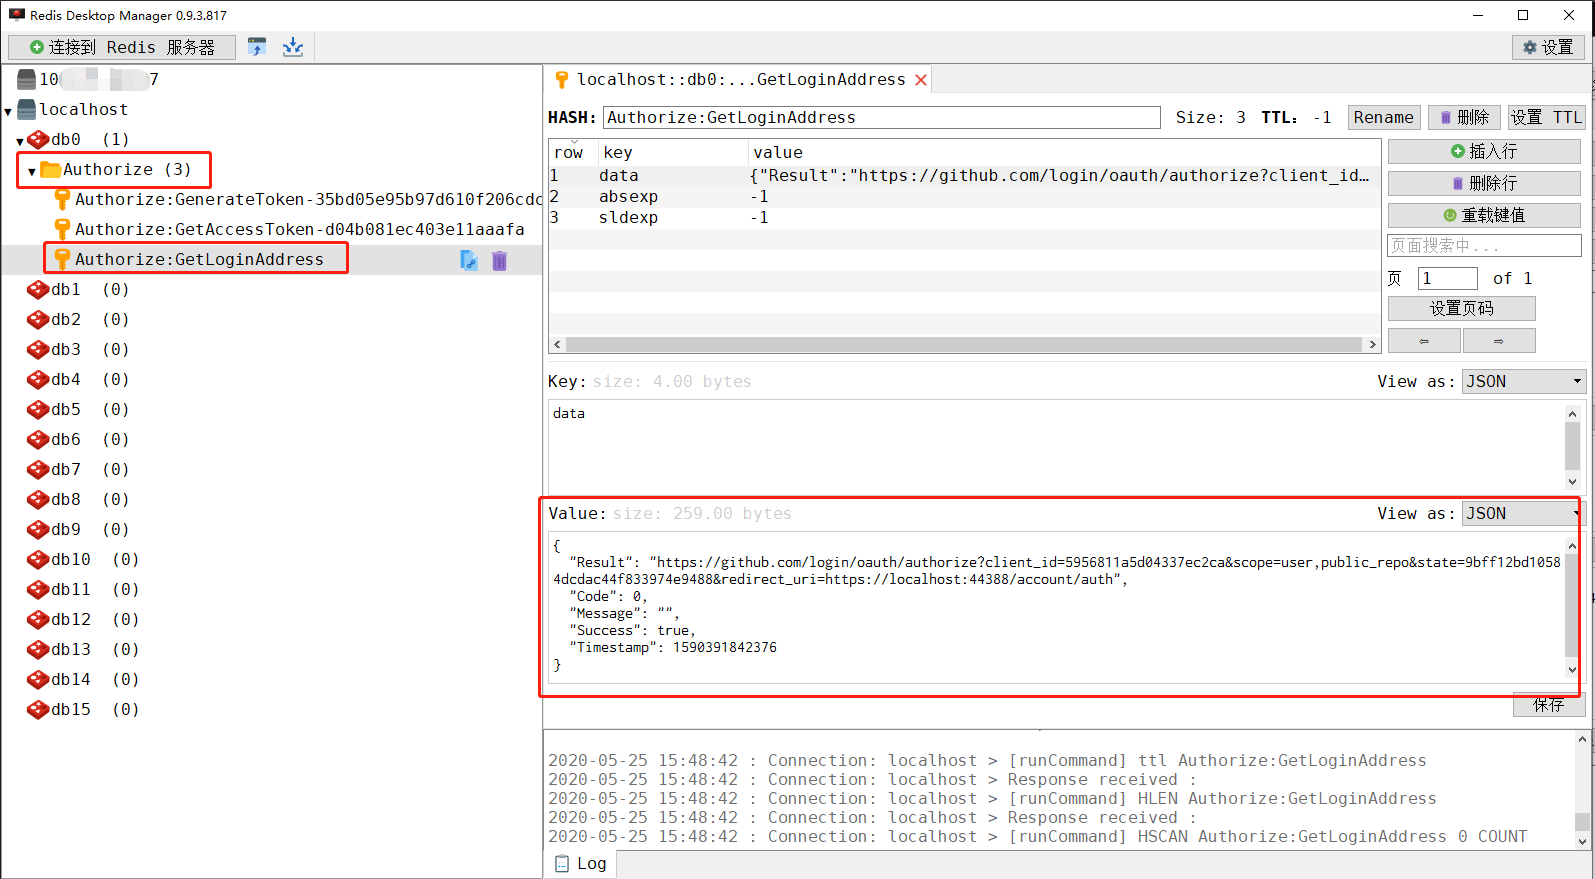
那么再次调用这个接口,只要没有过期,就会直接返回数据了,调试图如下:

可以看到,是可以直接取到缓存数据的,其他接口大家自己试试吧,一样的效果。
是不是很简单,用最少的代码集成Redis进行数据缓存,你学会了吗?😁😁😁